
Building Your First Story With MapperKeeper!
MapperKeeper is an online platform for telling stories with maps. It has useful tools and intuitive workflows to help you create and share your map with others. To help you get started, we built this tutorial that walks you through each step of building this map.
What We’re Buidling
We’re building a map to show the 2018 Boston Marathon and adding a rooftop bar location for those that prefer to experience the event with a beer in hand! Spectators need to know where to watch the race and see the marathon route. In this tutorial we will talk about adding GeoJSON files, linking to pictures and YouTube videos, and sharing your creation on Twitter and Facebook.
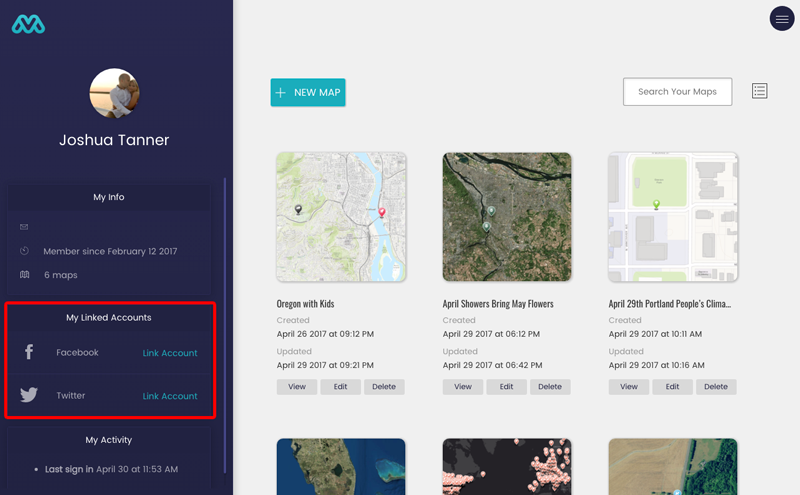
Step 1: Linking Your Social Media Accounts
Linking your social media accounts with your MapperKeeper account lets you quickly share your map on Twitter and Facebook. Once linked, you can share a summary and picture of your map to social media with a single click. On the dashboard page, link your desired social media accounts by clicking link account in the left sidebar. This step is optional, but strongly encouraged!
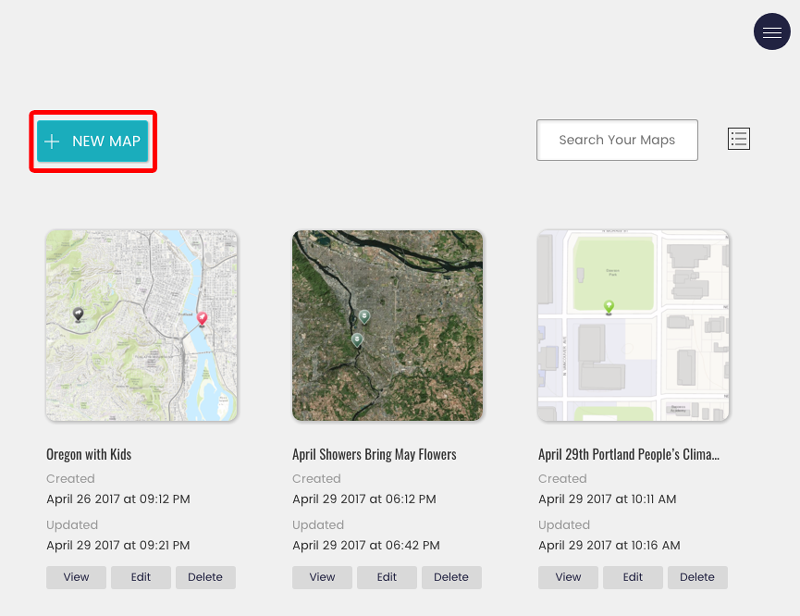
Step 2: Create a New Map
Your map dashboard will contain all of your great maps that you create. To get started with your first map, click the new map button.
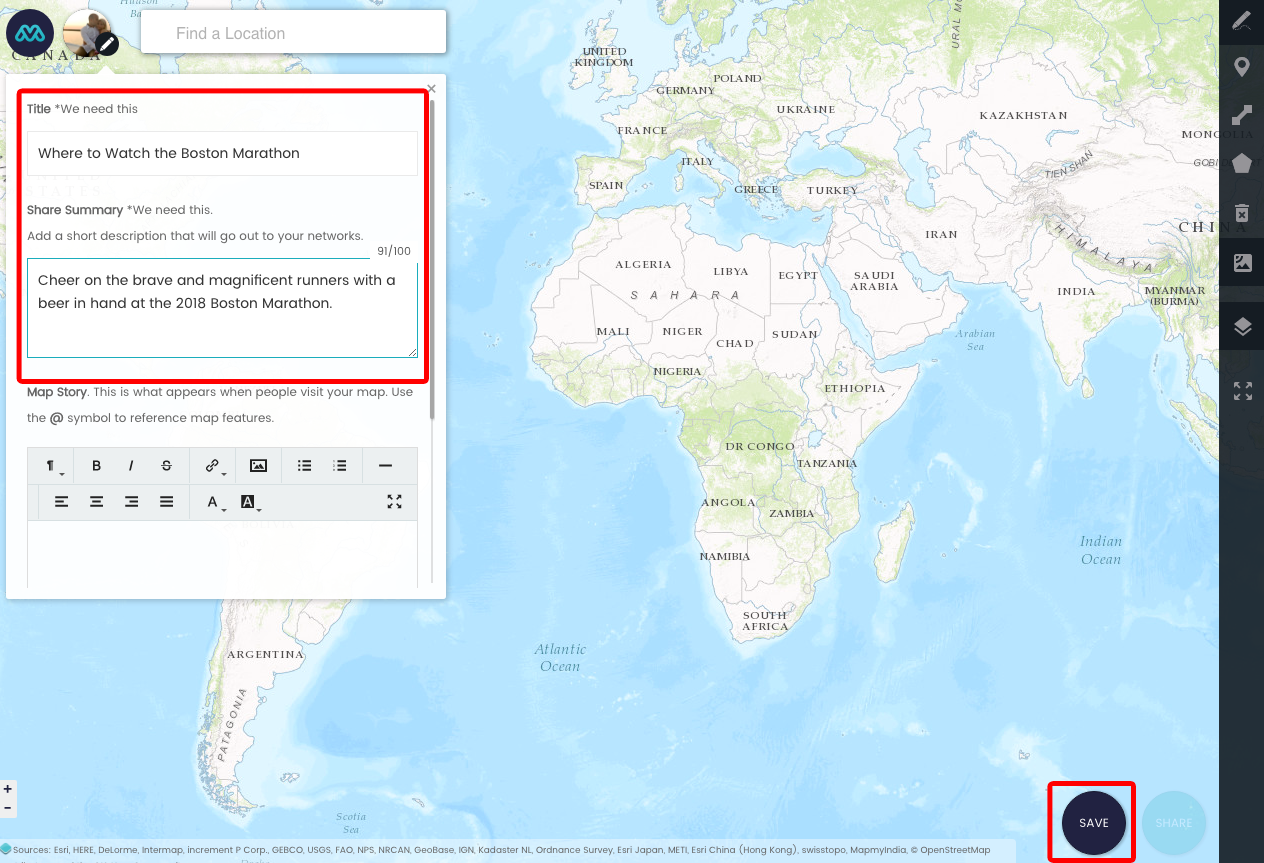
Step 3: Add Required Title and Summary
Before you can save your map, you must first add a title and summary. The title is a descriptive name for your map, and the summary is the text that will be posted to social media. After adding a title and summary, you can click save at the bottom right.
Step 4: Import Some Data
You can add features to your map by either drawing (points, lines, polygons) them directly, or importing data from many open formats (GeoJSON, KML, GPX, TopoJSON, IGC, CSV). We want to add the Boston Marathon route so that our viewers can see where the runners will be running during the race. Instead of drawing the route, let’s add it to the map from an existing GeoJSON file.
Right click on this link and select save link as and save it to your computer. After it is saved, you can import it using the map import tools on the right toolbar, or simply click and drag the file and drop it onto your map.

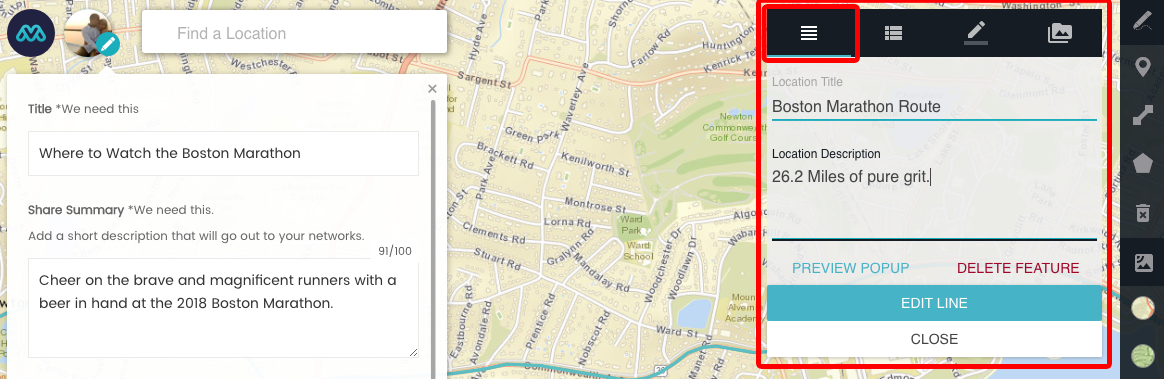
Step 5: Set Title and Description for Marathon Route
When users click on the marathon route, you want them to see a title and short description for the feature. Click on the line that was added to the map to open the feature tools. Here we can add a title and description. The title can also be used as a link when you are writing your story (we will get to this later).
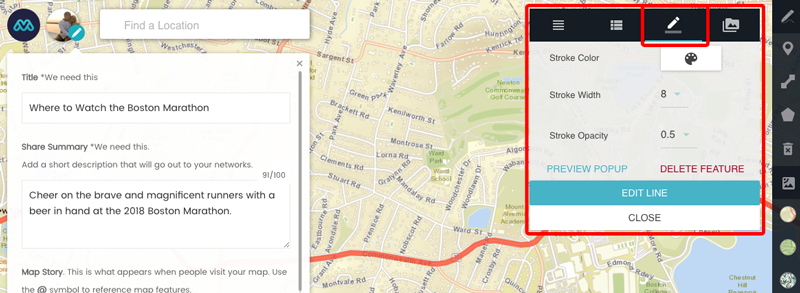
Step 6: Change the Color and Style of the Line
We can make the marathon route stand out better by changing the color and style of the line. Click the third tab on the feature tools toolbar to see the style options. Change the color, width, and transparency that you want. I’m using a nice red color. You can set the HEX value if you want to be more specific.
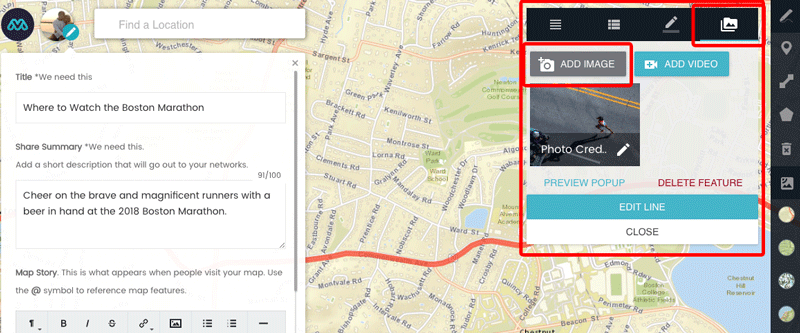
Step 6: Add a Photo and Video
Features can showcase photos and YouTube videos. When a user clicks on your map features, they can explore the media directly in the app. The first thing we will do is add a photo. Click on the last tab to add images and videos.
Select add image and add the following information:
Image Title: Photo Credit David Schap
Image URL: https://github.com/MapperKeeper/mapperkeeper.github.io/raw/master/images/tutorial/david-schap-marathon.png
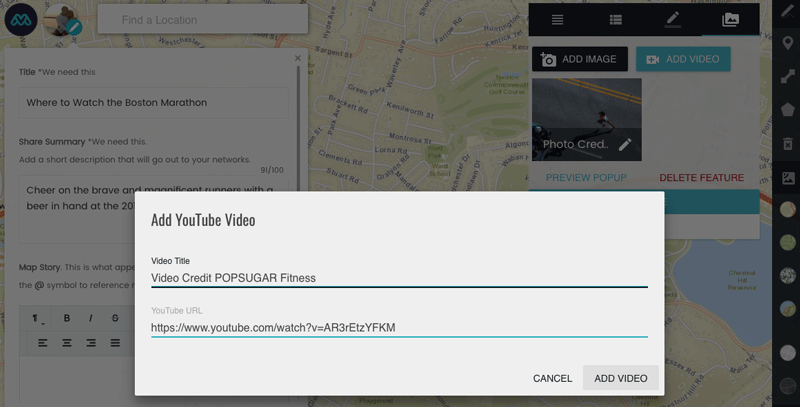
Lastly, select add video and add the following information:
Video Title: Video Credit POPSUGAR Fitness
YouTube URL: https://www.youtube.com/watch?v=AR3rEtzYFKM
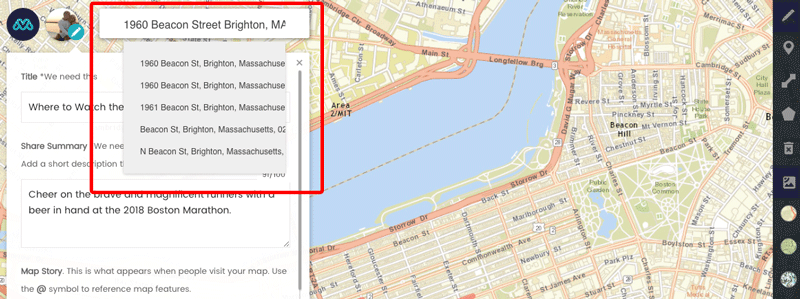
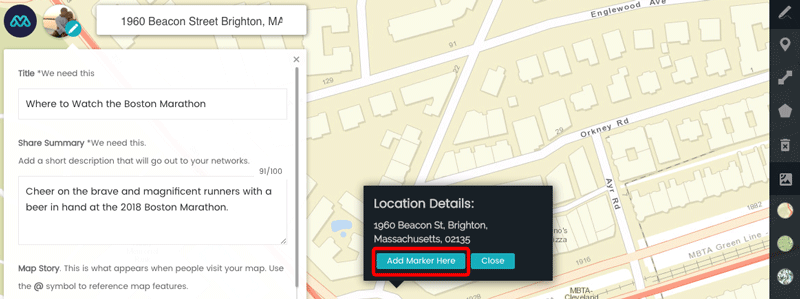
Step 7: Add Places for Spectators to Watch the Marathon
Now that we have the Boston Marathon route, we need to show locations of places that spectators can go to watch the race. For this tutorial, we will be adding one location; Cityside Bar, which is located on 1960 Beacon St Brighton, MA. Type the address or name of the location in the input box on the top left of the screen. As you type, you should see suggestions for related locations. When you are done, select the address or hit enter.
From the map popup, you can click on add marker here to add the location permanently to the map.
If you were building your own map, you might add many different locations. You can also use the drawing tools on the right toolbar for manually drawing on the map.
Step 8: Update Marker Details and Style
Just like we did with the Boston Marathon route, we will update the title, description, and style of the map feature. Start by clicking on the marker and setting the title and description.
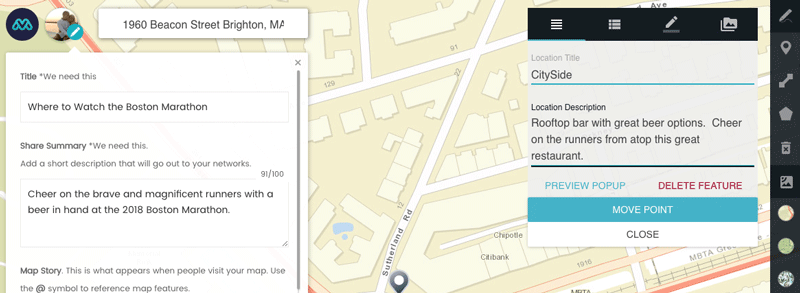
Add some unique styling. For this location, we will use a beer icon to represent a bar. There are many other icons to choose from.
![]()
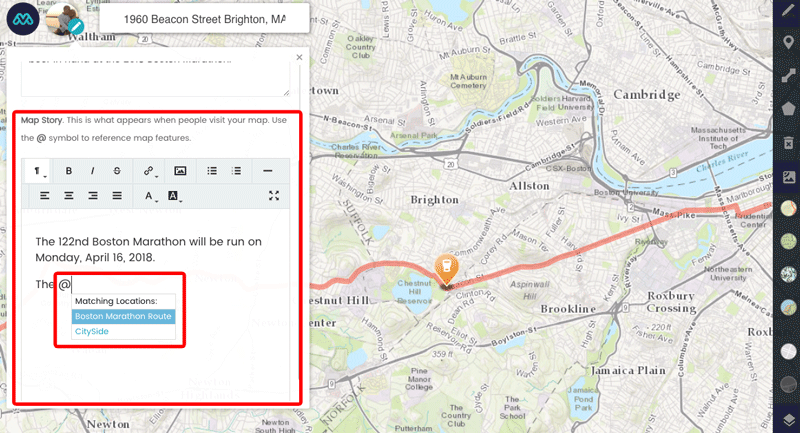
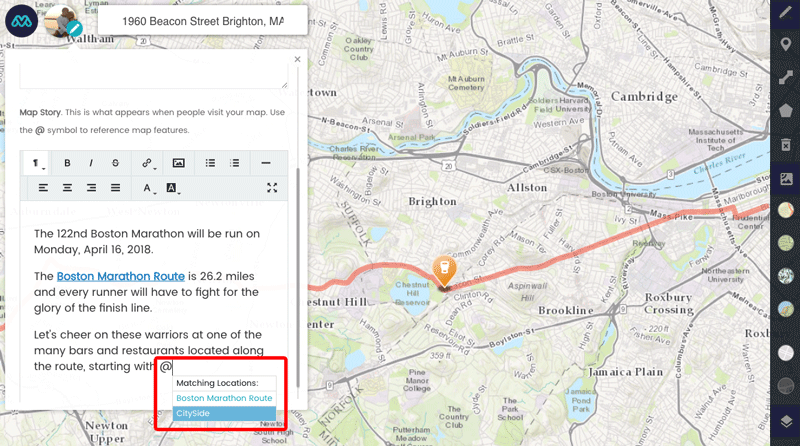
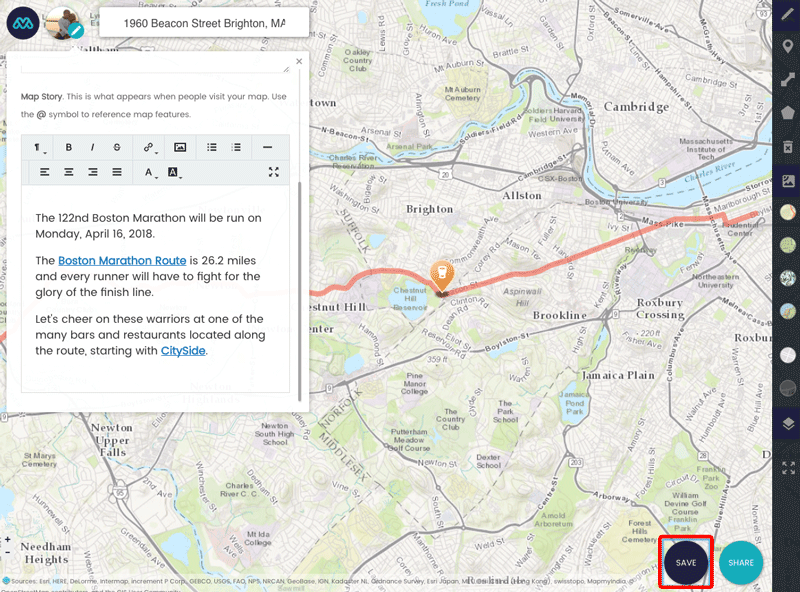
Step 9: Time to Write a Story
With MapperKeeper, you can write a story that describes your map. The story editor offers tools much like you would expect in a text editor. Within the story editor, you can even create links that reference the features on the map. By typing @, a dropdown will appear that let you choose locations on the map by their title.
Write a story about your map, making sure to mention the locations on the map.
Step 10: Save Your Map
When you are done, make sure to save your map with the save button in the lower right. Saving your map preserves your map features, and your story.
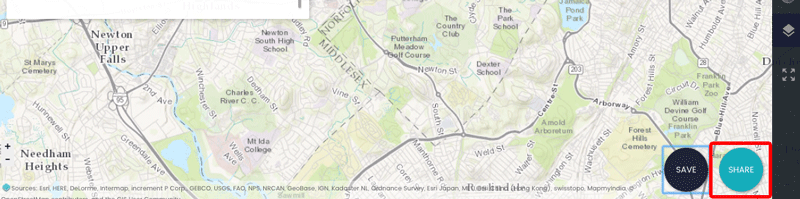
Step 10: Share Your Map
You didn’t spend all this time to keep such a great map to yourself. Maps in MapperKeeper are meant to be shared. Click the share button in the lower right.
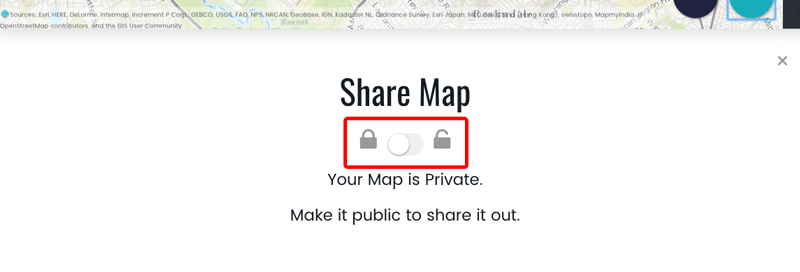
By defualt, your map is private until you want to share it. To make the map public, click the toggle switch.
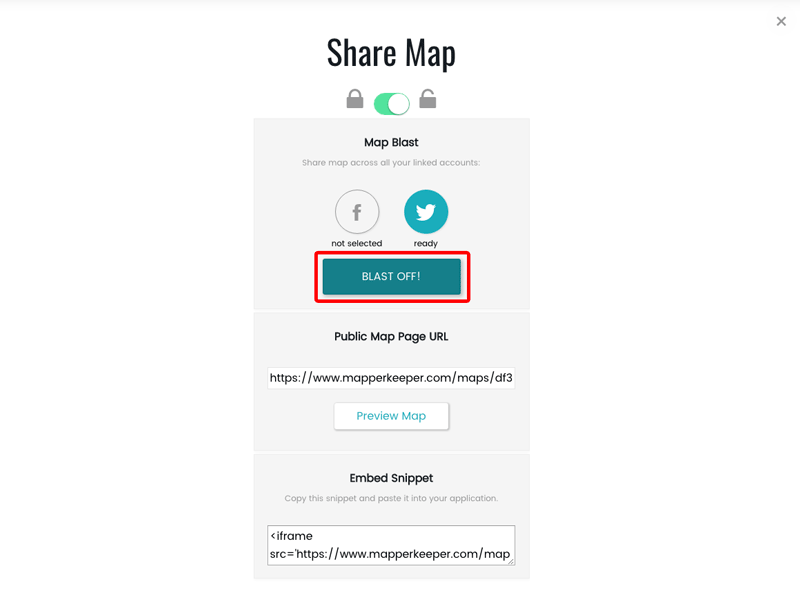
Once your map is made public, you have three sharing options:
- Blast your summary and a picture of your map directly to your social media accounts
- Copy the URL of the map and send it however you like (email, text, snail mail :))
- Embed the map with an iFrame in your own websites
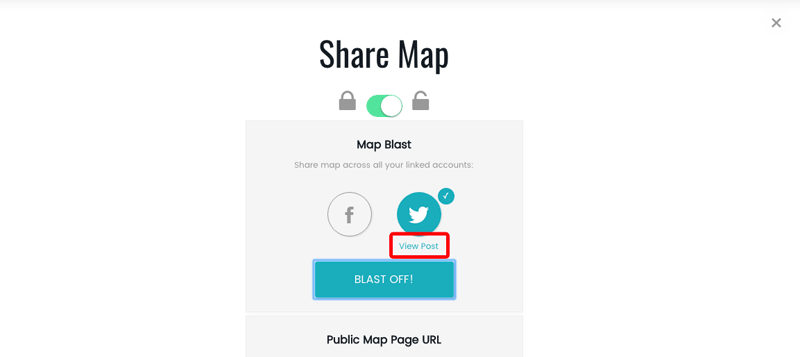
Step 11: Blast Your Map to Social Media
MapperKeeper helps you tell people about your map by quickly posting your map summary and an image of your map to your linked social media accounts. You can select either twitter, facebook, or both. When you are ready to share your map, click blast off!.
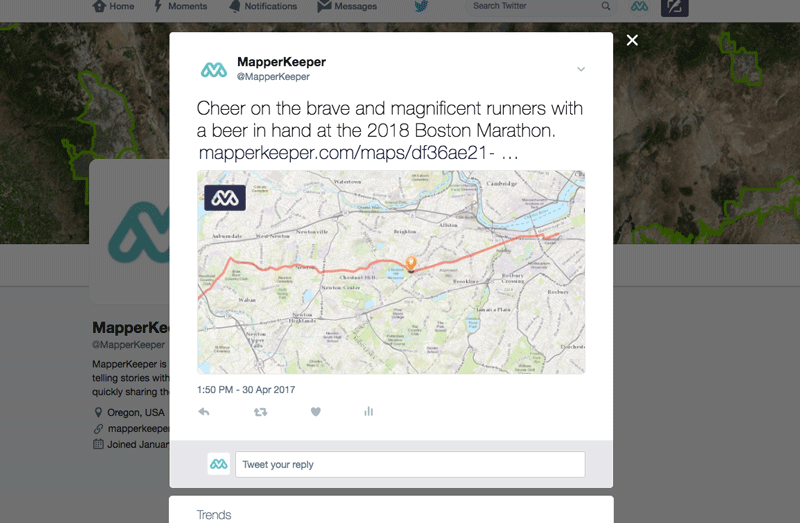
Once your social media accounts have been updated, a link to view your post will be available. Click on view post to see it on either Facebook or Twitter.
Step 12: Celebrate!!
You did it! You created your first map in MapperKeeper and shared to social media.
We hope you find MapperKeeper helpful and we are working hard every day to make it the best platform for building maps and telling stories. Get mapping!